Get Started
The best way to get started with Wealthica API is via the Wealthica JS SDKs (Frontend and Backend). You can take a look at the Wealthica Example project or follow the steps below:
1. Import the SDK
You can import the distribution build directly in your webpage:
<!-- Import the specific version -->
<script src="https://unpkg.com/wealthica-sdk-js@0.0.14/dist/wealthica.js"></script>

<!-- Or import the latest version (may contain breaking changes) -->

<script src="https://unpkg.com/wealthica-sdk-js/dist/wealthica.js"></script>
Or install and import it in a JS build system / NodeJS.
The same package is used for both frontend (web, mobile or desktop app) and backend (NodeJS).
npm install --save wealthica-sdk-js
// commonjs
const Wealthica = require('wealthica-sdk-js');

// esX
import Wealthica from 'wealthica-sdk-js';
2. Initialize the wealthica instance
A wealthica instance is initialized using your Client ID and Client Secret in the backend, or only Client ID in the frontend.
const wealthica = Wealthica.init({
  clientId: 'YOUR_CLIENT_ID',
  secret: 'YOUR_CLIENT_SECRET',
});
const wealthica = Wealthica.init({
  clientId: 'YOUR_CLIENT_ID',
  // optional parameters for authenticating the Wealthica frontend instance with your server.
  // See Authentication section for a more detailed explanation.
  authEndpoint: '/wealthica/auth', // default value, need to accept POST
  auth: {
    params: { userId: 'LOGGED_IN_USER_ID' }, // custom params for authEndpoint
    headers: {}, // custom headers for authEndpoint
  },
});
Log in a user to create a user instance if you want to request user data.
const user = wealthica.login('USERNAME');
// No need to pass username because it's assumed that the `authEndpoint`
// implementation on your backend server should already know that from
// your authenticated user.
const user = wealthica.login();
3. Connect a user, or request for data
Start the Connect process for users to connect their financial institution accounts, or call the SDK helper methods to request data.
// Get general Wealthica data
const providers = await wealthica.providers.getList();

// Get user data via the `user` instance
const institution = await user.institutions.getOne('INSTITUTION_ID');
// Get general Wealthica data
const providers = await wealthica.providers.getList();

// Start the Connect process when user clicks the Connect button
document.getElementById('#connect').addEventListener('click', () => {
  user.connect().onConnection(async (institutionId, data) => {
    console.log('provider', data.provider);

    const institution = await user.institutions.getOne(institutionId);
    displayAccount(institution);
  });
}, false);
4. Wealthica Connect Flow Schema
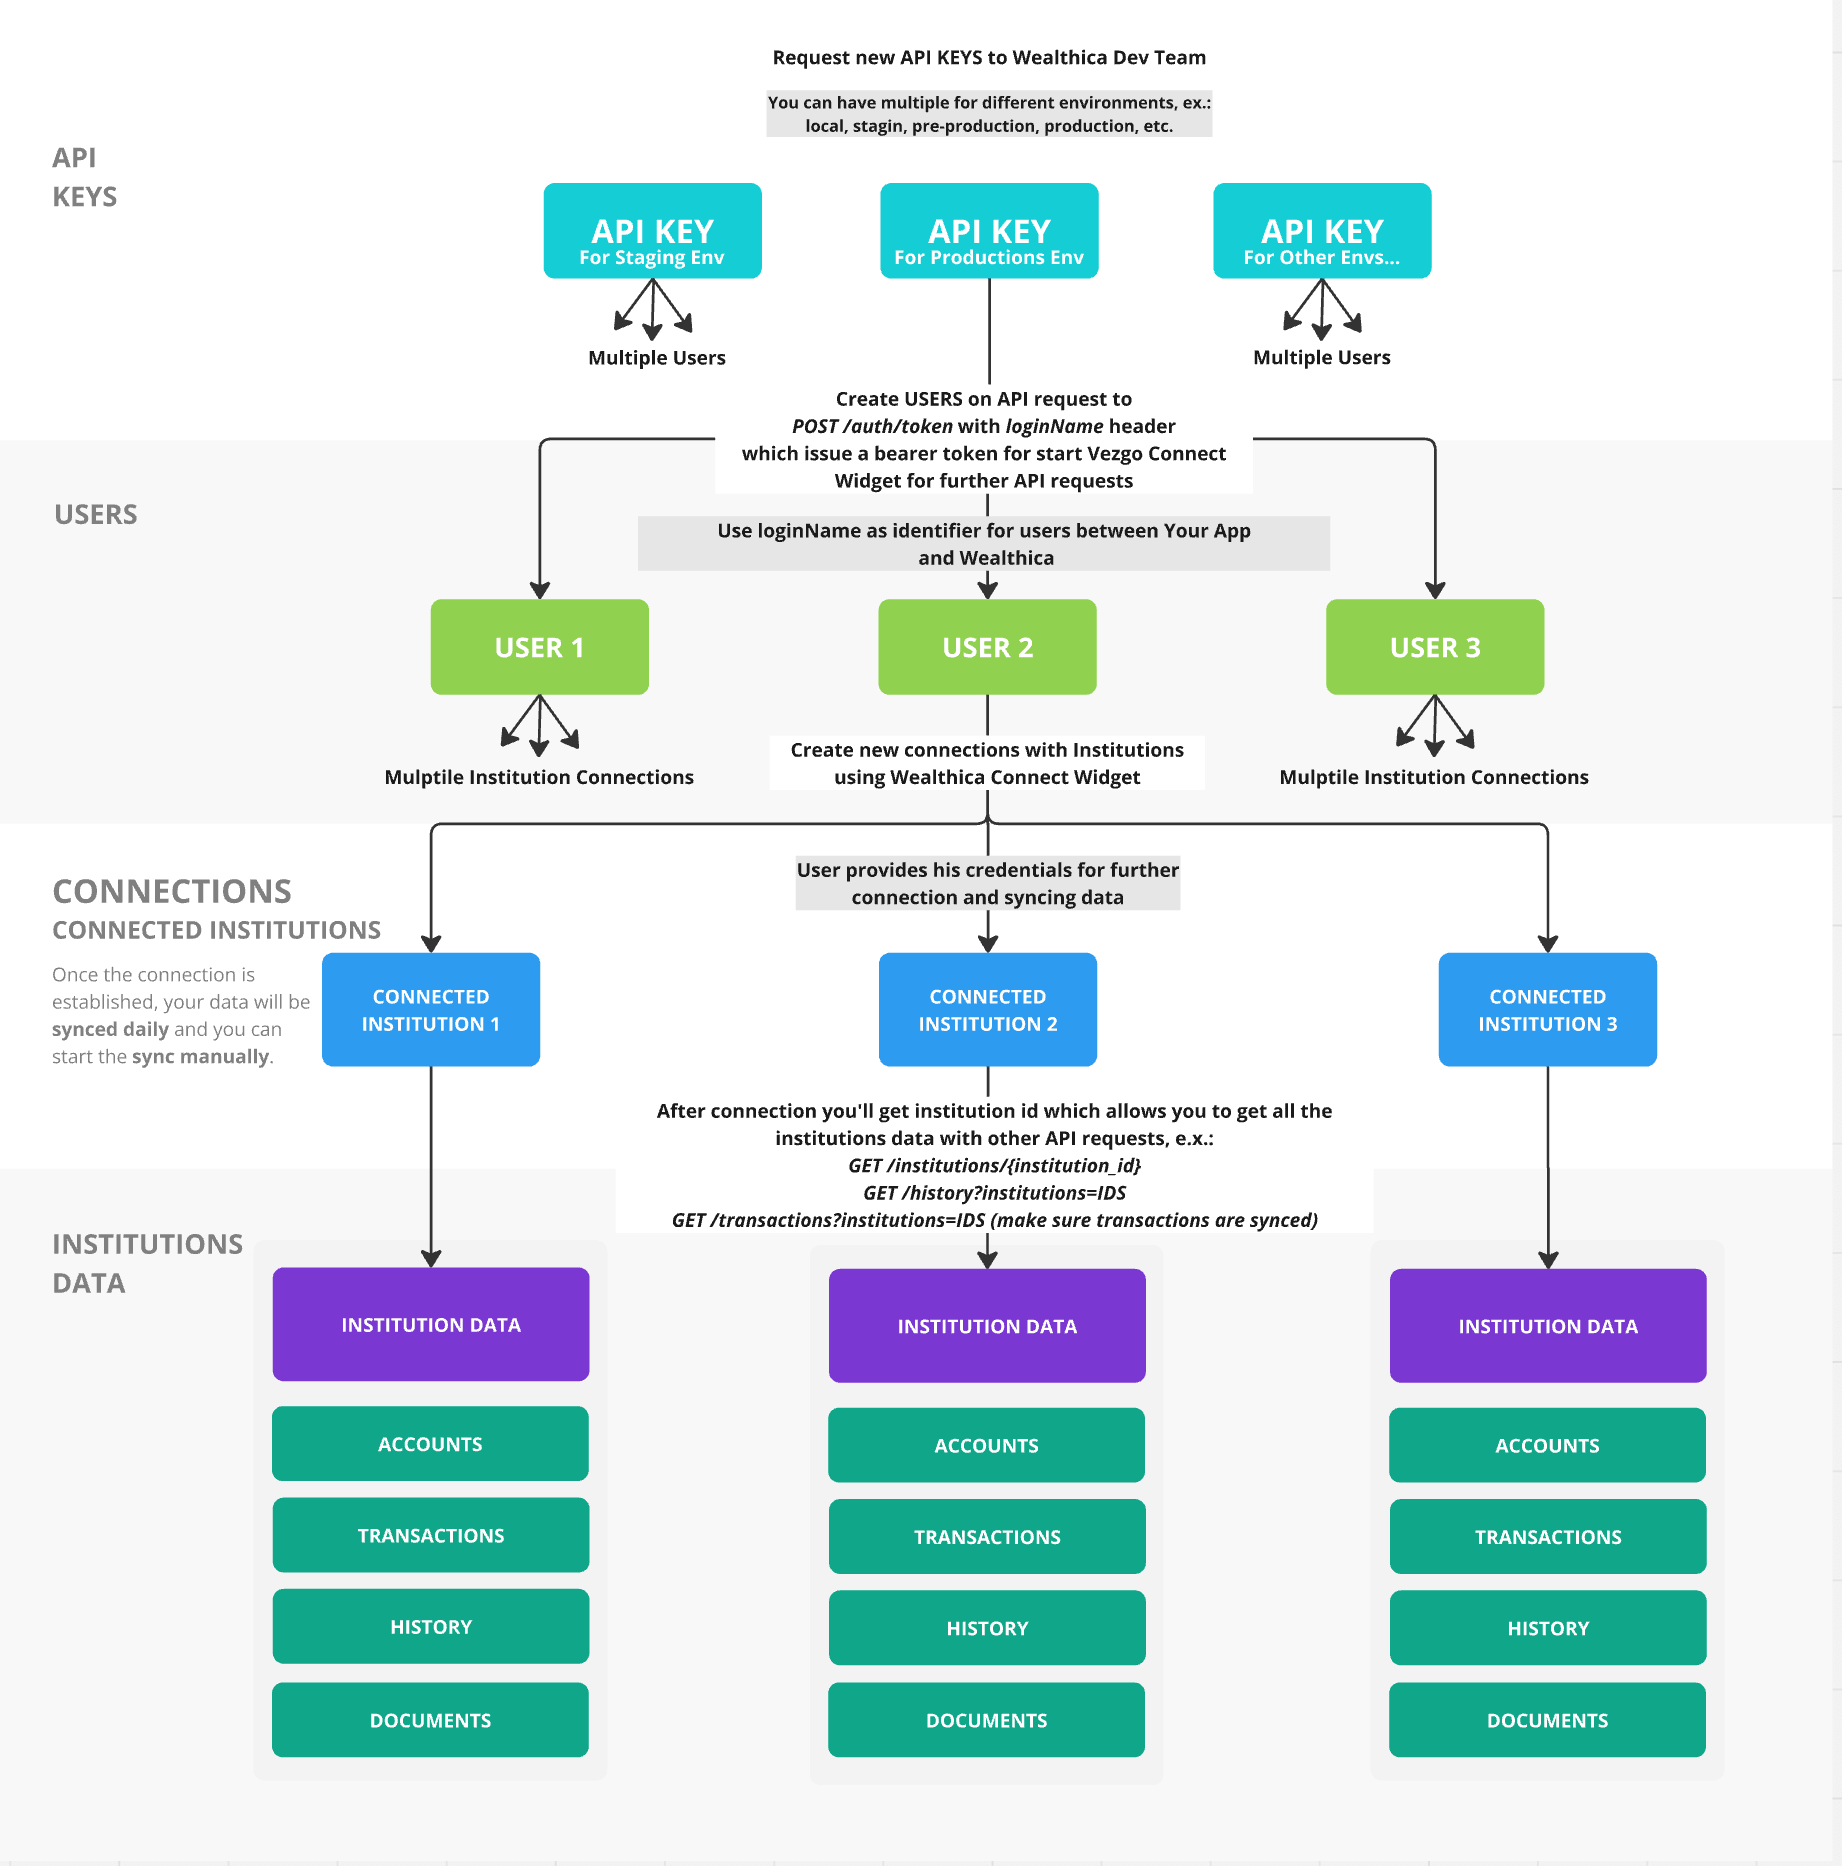
The Wealthica Connect Schema describes how to integrate with the Wealthica API to manage user connections, financial institutions, and account data. This step-by-step guide explains how to:
- Obtain API keys.
- Create users with a unique
loginName. - Connect to financial institutions.
- Retrieve and sync account data.
- Use the data in your application.
It also highlights why the loginName is essential for linking users between your app and Wealthica.
Step 1: Obtain API Keys
- What: Request API keys from the Wealthica Team to authenticate API requests.
- How:
- Contact Wealthica to get keys for different environments (e.g., staging, production).
- You can request multiple keys (e.g., one for local testing, one for production).
- Why: API keys are the starting point for all interactions with Wealthica.
Example:
- API Key for Staging Env: Used for testing.
- API Key for Production Env: Used for live deployment.
Step 2: Create Users
- What: Create users on Wealthica using an API key and a unique
loginName. - How:
- Send a
POST /auth/tokenrequest with theloginName. - Wealthica returns a bearer token for that user.
- Send a
- Why: The bearer token authorizes further actions, like starting the Wealthica Connect Widget or making API calls.
Example:
- API Key for Production Env creates:
- User 1 with
loginName: user_12345→ Gets bearer token. - User 2 with
loginName: user_67890→ Gets bearer token.
- User 1 with
Step 3: Establish Institution Connections
- What: Connect users to financial institutions via the Wealthica Connect Widget.
- How:
- Users enter their institution credentials (e.g., bank login) in the widget.
- Each user can connect to multiple institutions.
- Why: Connections allow Wealthica to access and sync financial data.
- Details:
- Data syncs automatically daily, with manual sync available.
Example:
- User 1 → Connected Institution 1 (e.g., a bank).
- User 2 → Connected Institution 2 (e.g., an investment account).
Step 4: Retrieve and Sync Data
- What: Fetch financial data from connected institutions using API requests.
- How:
- Use endpoints like:
GET /institutions/{institution_id}for account details.GET /transactions/institutions-idsto check or trigger transaction syncing.
- Use endpoints like:
- Why: Provides access to accounts, transactions, and other financial data.
- Details:
- Data syncs daily, but you can manually trigger updates.
Example:
- Connected Institution 1 → Institution Data 1 (e.g., account balances).
- Connected Institution 2 → Institution Data 2 (e.g., transaction history).
Step 5: Utilize Data
- What: Integrate the retrieved data into your application.
- How: Use the data for features like financial tracking, reporting, or analysis.
- Why: Enhances your app with real-time financial insights.
Example:
- User 1 uses Institution Data 1 to track their portfolio.
Why loginName Matters
The loginName is a unique identifier you assign to each user when creating them in Wealthica. It ensures accurate linking between your app and Wealthica.
Key Reasons
- Uniqueness:
- Prevents data mix-ups (e.g., two users with the same
loginNamewould share data).
- Prevents data mix-ups (e.g., two users with the same
- Linking:
- Maps your app’s user IDs to Wealthica (e.g., User ID
12345→loginName: user_12345).
- Maps your app’s user IDs to Wealthica (e.g., User ID
- Data Access:
- Ensures requests fetch the right user’s data.
- Security:
- Bearer tokens are tied to
loginName, restricting access to authorized users.
- Bearer tokens are tied to
- Scalability:
- Supports growth without confusion as more users join.
How It Works
- Creation:
- Send
POST /auth/tokenwith your API key andloginName→ Get a bearer token.
- Send
- Consistency:
- Use the same
loginNamefor all requests for that user.
- Use the same
- Retrieval:
- Use the bearer token to access that user’s data.
Best Practices
- Make it unique: No duplicates within your app.
- Keep it consistent: Same
loginNamefor all calls per user. - Keep it simple: Use your app’s user IDs (e.g.,
user_12345). - Avoid sensitive info: Don’t use personal data like emails.
Summary
- Get API Keys: Request from Wealthica for your environments.
- Create Users: Use
POST /auth/tokenwith a uniqueloginNameto generate bearer tokens. - Connect Institutions: Link users to financial institutions via the Wealthica Connect Widget.
- Retrieve Data: Use API calls like
GET /institutions/{institution_id}to fetch data. - Use Data: Integrate into your app for financial features.
The loginName ensures a secure, seamless connection between your app and Wealthica.